the perfect chainline
Always searching for that perfect chainline on your singlespeed, huh?
Most people just eye-ball it.
I was doing that for years and then one evening last year I decided to put some science to it and take advantage of the laws of physics.
Been meaning to take photos and write about this for quite a while. While setting up the Superfly last night for this weekend's Ronde, I finally broke out the camera [phone] and snapped some photos.
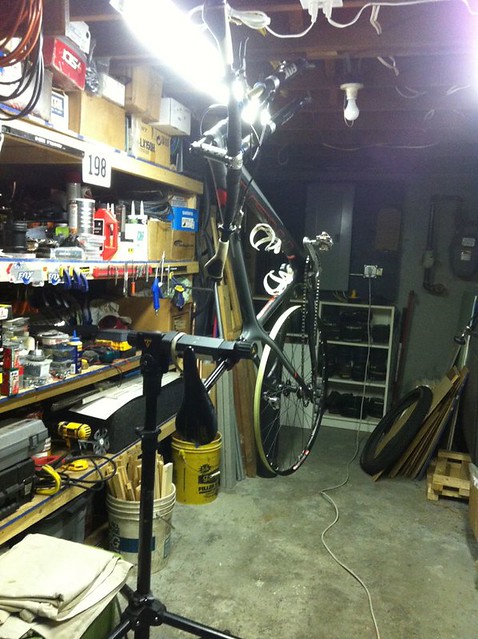
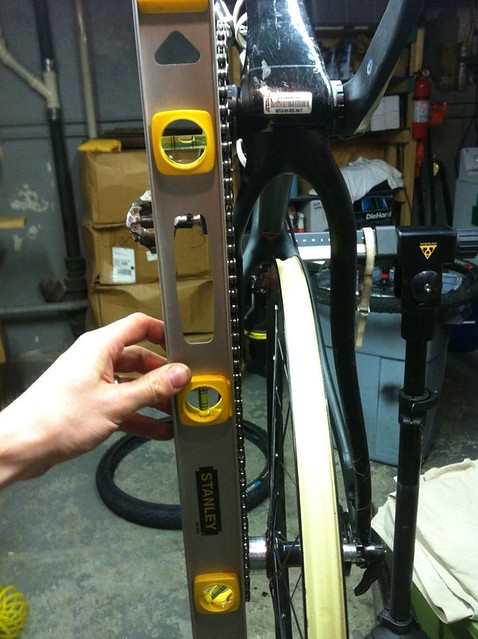
The theory behind this is my taking advantage of gravity. You'll need a bike stand, as shown above, a level and some patience.
Step 1) Get the bicycle oriented in the bicycle stand so that the rear wheel (properly seated in the drop-outs) looks somewhat plumb.
Step 2) Take your mason's (or carpenter's) level and rest it against the rear wheel. Rear wheel can be without a tire as shown in the photos or with a tire. I've found accuracy to be similar in both cases given the high volume tires I tend to ride.
Adjust the bicycle so that the level shows the wheel is perfectly plumb.
Once the wheel is perfectly plumb then your bicycle's chainring and wheel are aligned to a common reference. The common reference we are using in this case is the vertical plane and will be taking advantage of gravity in relation to said plane.
Step 3) Place your chain over the chainring and let it hang down over the rear freehub body. Since the wheel and bicycle are now perfectly plumb then gravity will place the chain where it wants to be on the freehub body. This location is your 'perfect chainline'.
Note the location on the freehub body. Remove the rear wheel from the frame and space out your cog to get the cog as close as possible to the chain position. Tighten down the cog and spacer kit on the freehub body and re-install the wheel in the drop-out.
Step 4) Double check that the rear wheel is plumb and reinstall chain so it is hanging over the cog on the freehub body of the rear wheel. If done carefully the bicycle will not move in the stand and you will not have to double check if the rear wheel is plumb.
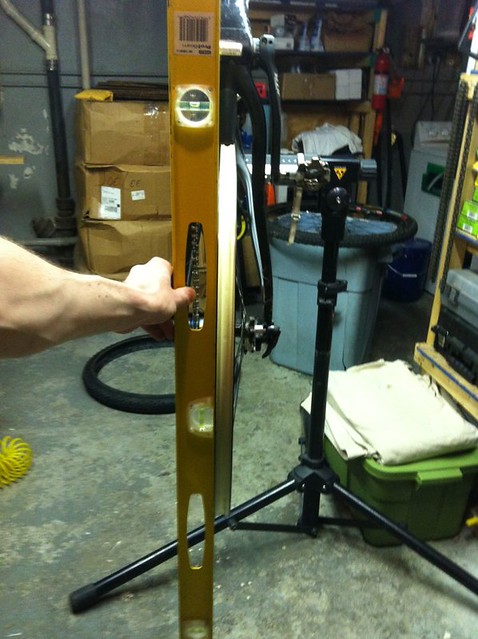
Step 5) Place your mason's (or carpenter's) level on the side of the chain spanning the chainring and the cog on the rear wheel. If the cog is placed in the proper location than the level will show that it is plumb.
In the example image above, I was off slightly on my first try. I therefore repositioned the cog and tried again.
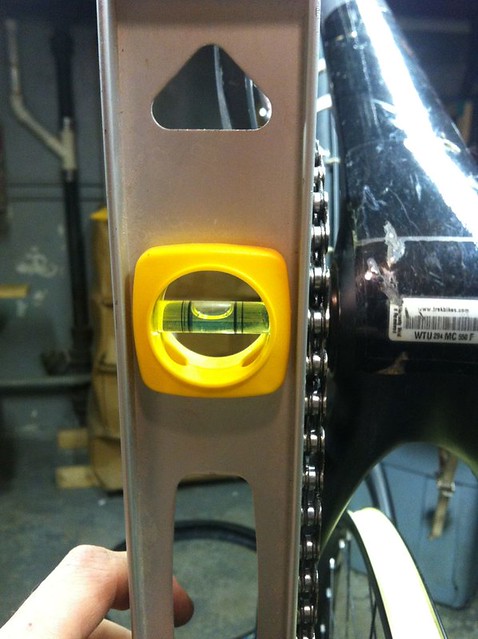
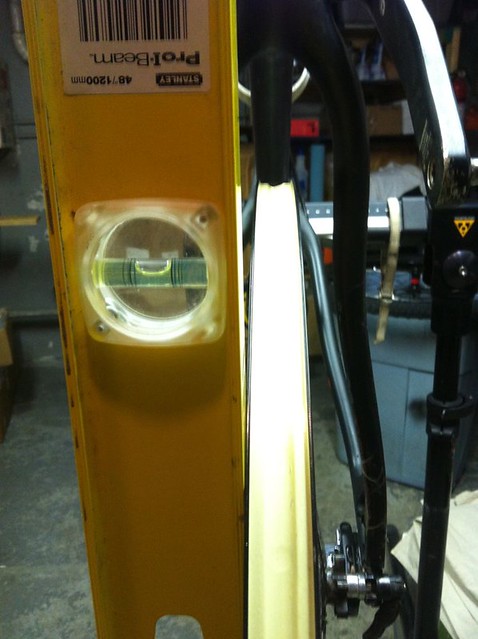
The second time I got the chainline perfect.
Step 6) With the cog spaced out the proper distance on the rear wheel freehub body the bicycle can now be brought to the upright position and chain tension set via whatever means you are using to maintain chain tension. My Superfly uses sliding rear drop-outs so I moved them to get the proper chain tension.
And there you have it, perfect chainline with some science behind it.
Tomorrow I will talk about my first mountain bike ride this year on a 61.6inch gear and revisiting an old [not so quite] friend.
Most people just eye-ball it.
I was doing that for years and then one evening last year I decided to put some science to it and take advantage of the laws of physics.
Been meaning to take photos and write about this for quite a while. While setting up the Superfly last night for this weekend's Ronde, I finally broke out the camera [phone] and snapped some photos.
The theory behind this is my taking advantage of gravity. You'll need a bike stand, as shown above, a level and some patience.
Step 1) Get the bicycle oriented in the bicycle stand so that the rear wheel (properly seated in the drop-outs) looks somewhat plumb.
Step 2) Take your mason's (or carpenter's) level and rest it against the rear wheel. Rear wheel can be without a tire as shown in the photos or with a tire. I've found accuracy to be similar in both cases given the high volume tires I tend to ride.
Adjust the bicycle so that the level shows the wheel is perfectly plumb.
Once the wheel is perfectly plumb then your bicycle's chainring and wheel are aligned to a common reference. The common reference we are using in this case is the vertical plane and will be taking advantage of gravity in relation to said plane.
Step 3) Place your chain over the chainring and let it hang down over the rear freehub body. Since the wheel and bicycle are now perfectly plumb then gravity will place the chain where it wants to be on the freehub body. This location is your 'perfect chainline'.
Note the location on the freehub body. Remove the rear wheel from the frame and space out your cog to get the cog as close as possible to the chain position. Tighten down the cog and spacer kit on the freehub body and re-install the wheel in the drop-out.
Step 4) Double check that the rear wheel is plumb and reinstall chain so it is hanging over the cog on the freehub body of the rear wheel. If done carefully the bicycle will not move in the stand and you will not have to double check if the rear wheel is plumb.
Step 5) Place your mason's (or carpenter's) level on the side of the chain spanning the chainring and the cog on the rear wheel. If the cog is placed in the proper location than the level will show that it is plumb.
In the example image above, I was off slightly on my first try. I therefore repositioned the cog and tried again.
VICTORY!
The second time I got the chainline perfect.
Step 6) With the cog spaced out the proper distance on the rear wheel freehub body the bicycle can now be brought to the upright position and chain tension set via whatever means you are using to maintain chain tension. My Superfly uses sliding rear drop-outs so I moved them to get the proper chain tension.
And there you have it, perfect chainline with some science behind it.
Tomorrow I will talk about my first mountain bike ride this year on a 61.6inch gear and revisiting an old [not so quite] friend.
posted by dougyfresh at 10:56 PM
![]()
![]()


4 Comments:
That sir, is genius. I'll have to try that next time for the perfect chain line. Thanks.
Can't you simply subtract your cranks chainline from half your dropout spacing and space your cog that distance from the endcap/locknut?
i.e. 50mm chainline - 67.5 mm (135 mm spacing) = 17.5 mm ctrd from the end cap.
Can you try Charle's equation to see if they match up? I'm going to try this tonight and see if my eay ball method is close.
Yes. I could have measured everything up and backed out the cog position relative to the freehub body lock-nut.
The math adds up.
This bike just happens to have a 50.5mm chainline and 135mm rear hub spacing. The locknut is 3.5mm from the end of the axle which gives me about 13.5mm from the lock nut. That equals what I netted via the level method.
Guess it was faster for me to use the level and not all of our bikes use a 50-50.5mm chainline.
You probably would have figured I'd go the math route [first] as suggested. The level caught my eye before measuring up the bike...
Post a Comment
<< Home